本站总访问量次
Spring中的一些常见命名空间的配置
作者:leftover
字数统计:5.7k 字
阅读时长:33 分钟
p命名空间
xml
<?xml version="1.0" encoding="UTF-8"?>
<beans xmlns="http://www.springframework.org/schema/beans"
       xmlns:p="http://www.springframework.org/schema/p"
       xmlns:xsi="http://www.w3.org/2001/XMLSchema-instance"
       xsi:schemaLocation="http://www.springframework.org/schema/beans http://www.springframework.org/schema/beans/spring-beans.xsd">
</beans>c命名空间
xml
<?xml version="1.0" encoding="UTF-8"?>
<beans xmlns="http://www.springframework.org/schema/beans"
       xmlns:c="http://www.springframework.org/schema/c"
       xmlns:xsi="http://www.w3.org/2001/XMLSchema-instance"
       xsi:schemaLocation="http://www.springframework.org/schema/beans http://www.springframework.org/schema/beans/spring-beans.xsd">
</beans>context 命名空间
xml
<?xml version="1.0" encoding="UTF-8"?>
<beans xmlns="http://www.springframework.org/schema/beans"
       xmlns:context="http://www.springframework.org/schema/context"
       xmlns:xsi="http://www.w3.org/2001/XMLSchema-instance"
       xsi:schemaLocation="http://www.springframework.org/schema/beans http://www.springframework.org/schema/beans/spring-beans.xsd
                           http://www.springframework.org/schema/context http://www.springframework.org/schema/context/spring-context.xsd"

</beans>aop命名空间
xml
<?xml version="1.0" encoding="UTF-8"?>
<beans xmlns="http://www.springframework.org/schema/beans"
       xmlns:aop="http://www.springframework.org/schema/aop"
       xmlns:xsi="http://www.w3.org/2001/XMLSchema-instance"
       xsi:schemaLocation="http://www.springframework.org/schema/beans http://www.springframework.org/schema/beans/spring-beans.xsd
                http://www.springframework.org/schema/aop http://www.springframework.org/schema/aop/spring-aop.xsd
">

</beans>tx命名空间(事务的命名空间)
xml
<?xml version="1.0" encoding="UTF-8"?>
<beans xmlns="http://www.springframework.org/schema/beans"
       xmlns:tx="http://www.springframework.org/schema/tx"
       xmlns:xsi="http://www.w3.org/2001/XMLSchema-instance"
 xsi:schemaLocation="http://www.springframework.org/schema/beans http://www.springframework.org/schema/beans/spring-beans.xsd
                     http://www.springframework.org/schema/tx http://www.springframework.org/schema/tx/spring-tx.xsd
">
</beans>util命名空间
xml
<?xml version="1.0" encoding="UTF-8"?>
<beans xmlns="http://www.springframework.org/schema/beans"
       xmlns:xsi="http://www.w3.org/2001/XMLSchema-instance"
       xmlns:util="http://www.springframework.org/schema/util"
       xsi:schemaLocation=
               "http://www.springframework.org/schema/beans http://www.springframework.org/schema/beans/spring-beans.xsd
                http://www.springframework.org/schema/util http://www.springframework.org/schema/util/spring-util.xsd"
>
</beans>Spring的一些基本概念
OCP 开闭原则
- 对扩展开发,对修改关闭,OCP原则是最核心、最基本的原则,其他六个原则都是为这个原则服务的
- OCP原则的核心:
- 只能你在扩展系统的功能时,没有修改以前写好的代码,那么你就是符合OCP原则的,反之,则不符合
依赖倒置原则(DIP原则)
依赖倒置原则的核心?
面向接口编程,面向抽象编程,不要面向具体的实现编程
依赖倒置原则的目的?
降低程序的耦合度,提高扩展力
什么叫符合依赖倒置原则?
上层的代码 不具体依赖于下层的代码的具体的实现
即下层代码的改动不会影响到上层代码
控制反转(IoC:Inversion of Control)一种编程思想
控制反转是用来解决OCP和DIP问题的
- 什么是控制反转?
- 不在程序中采用硬编码的方式来new对象了 (把new对象的权利交出去了)
- 不在程序中采用硬编码的方式来维护对象的关系了(把对象之间关系的维护权也交出去了)
Spring框架
- spring 框架实现了IoC这种思想,
- spring框架可以帮你new 对象
- spring 框架可以帮你维护对象与对象之间的关系
- Spring 是一个实现了IoC框架的容器
- 控制反转的实现方式有很多种,比较重要的一种为
依赖注入(Dependency Injection,简称DI)
依赖注入
- 控制反转是一种编程思想,而依赖注入是这种思想的具体实现
- 依赖注入DI,又包括常见的两种方式:
- set注入(执行set方法给属性赋值)
- 构造方法注入(执行构造方法给属性赋值)
- 依赖注入:对象A和对象B之间的关系,靠注入的手段来维护。而注入包括set注入和构造方法注入
一些术语
OCP:开闭原则
DIP:依赖倒置原则
IoC:控制反转(一种编程思想)
DI:依赖注入(IoC的一种实现方式)
依赖注入
set注入
xml
<!-- spring.xml配置文件-->
<!--        在创建当前的bean时,会自动注入依赖,即自动调用set方法传入对应的对象-->
    <bean id="userService" class="leftover.service.UserService">
<!--        name 的值为set方法去掉set 后 第一个字母小写-->
<!--        例如set 方法名为 setVipDao  name填vipDao-->
<!--        ref 是指引用的哪个bean,指出bean的id-->

        <property name="userDao" ref="userDao" />
        <property name="vipDao" ref="vipDao" />
    </bean>

        <bean id="userDao" class="leftover.dao.UserDao"/>
<bean id="vipDao" class="leftover.dao.VipDao"/>java
//service 层的代码
public class UserService {
    private UserDao userDao;
    private VipDao vipDao;

    public void setVipDao(VipDao vipDao) {
        this.vipDao = vipDao;
    }

    public void setUserDao(UserDao userDao) {
        this.userDao = userDao;
    }

    public void deleteVipUser() {
        vipDao.delete();
    }
    public  void  insertUser() {
        userDao.insert();
    }
}java
	//测试类
		@Test
    public  void  testUserService () {
        ClassPathXmlApplicationContext applicationContext = new ClassPathXmlApplicationContext("spring.xml");
      //创建 userService对象 ,会自动注入UserDao 和VipDao 对象
        UserService userService = applicationContext.getBean(UserService.class);
      //调用对应的方法
        userService.insertUser();
        userService.deleteVipUser();
}构造函数注入
xml
  <bean id="userDao" class="leftover.dao.UserDao"/>
    <bean id="vipDao" class="leftover.dao.VipDao"/>
    <!--    构造函数注入-->
    <!--   第一种方式: index 指定参数的位置 ref指定使用哪个bean ,写的时bean的id-->
    <bean id="userService" class="leftover.service.UserService">
        <constructor-arg index="0" ref="userDao"/>
        <constructor-arg index="1" ref="vipDao"/>
    </bean>
<!--    第二种方式  name指定构造函数中的参数名称,ref指定使用哪个bean 写的是bean 的id-->
    <bean id="userService1" class="leftover.service.UserService">
        <constructor-arg name="userDao" ref="userDao"/>
        <constructor-arg name="vipDao" ref="vipDao"/>
    </bean>
<!--    第三种方式 ,也可以不写name 和index ,只写ref ,让spring自动匹配 ,but可读性较差-->
    <bean id="userService2" class="leftover.service.UserService">
        <constructor-arg ref="userDao"/>
        <constructor-arg ref="vipDao" />
</bean>简单数据类型注入
这里的简单数据类型是指:8种基本数据类型及其包装类 + Enum ,String ,CharSequence + Number + Date + Temporal + ZoneId + TimeZone +File + Path + URL + URI + InetAddress + Charset + Currency + Locale + UUID + Pattern + Class
xml
<!--    简单数据类型注入-->
<bean id="sendEmailService" class="leftover.service.sendEmailService">
    <property name="emailDao" ref="emailDao"/>
</bean>
<bean id="emailDao" class="leftover.dao.EmailDao">
    <property name="name" value="zwc"/>
    <property name="address" value="shicheng"/>
</bean>级联属性赋值
xml
<!--    级联属性赋值-->
    <bean id="sendEmailService1" class="leftover.service.sendEmailService">
<!--       这里级联属性赋值,顺序不能变emailDao 要在前面 且要提供emailDao的get方法-->
        <property name="emailDao" ref="emailDao"/>
        <property name="emailDao.name" value="zwc111"/>
        <property name="emailDao.address" value="shicheng111"/>
</bean>其他的一些注入
xml
    <bean id="w1" class="leftover.dao.Women">
        <property name="name" value="小红"/>
    </bean>
    <bean id="w2" class="leftover.dao.Women">
        <property name="name" value="小花"/>
    </bean>
    <bean id="w3" class="leftover.dao.Women">
        <property name="name" value="小蓝"/>
    </bean>

    <bean id="person" class="leftover.dao.Person">
<!--        数组注入简答类型-->
        <property name="names">
            <array>
                <value>zwc1</value>
                <value>zwc2</value>
                <value>zwc3</value>
            </array>
        </property>
<!--    数组注入复杂类型    -->
        <property name="womens">
            <array>
                <ref bean="w1"/>
                <ref bean="w2"/>
                <ref bean="w3"/>
            </array>
        </property>
<!--list注入-->
        <property name="hobbys">
            <list>
                <value>吃饭</value>
                <value>喝酒</value>
                <value>睡觉</value>
            </list>
        </property>

<!--        set注入-->
        <property name="address">
            <set>
                <value>石城</value>
                <value>石城</value>
                <value>石城</value>
                <value>石城1</value>
            </set>
        </property>
<!--        map注入-->
        <property name="phones">
            <map>
<!--                如果不是简单数据类型-->
<!--                <entry key-ref="" value-ref="" />-->
<!--                简单类型-->
                <entry key="1" value="120"/>
                <entry key="2" value="110"/>
                <entry key="3" value="119"/>
            </map>
        </property>
<!--      properties注入  -->
        <property name="properties" >
            <props >
                <prop key="username" >zwc666</prop>
                <prop key="password" >hellopassword</prop>
            </props>
        </property>
        <!--        注入null-->
        <property name="water">
            <null/>
        </property>

<!--注入特殊符号-->
<!--   CDATA里面的字符不会被xml解析,会被当成字符串  <![CDATA[]]>-->
        <property name="expression">
            <value><![CDATA[2 < 3]]></value>
        </property>

</bean>p命名空间注入
p命名空间注入是针对set注入的,为了简化set注入,需要添加p命名注入的的约束文件
xml
<?xml version="1.0" encoding="UTF-8"?>
<beans xmlns="http://www.springframework.org/schema/beans"
		<!-- 需要添加p命名注入的的约束文件 -->
       xmlns:p="http://www.springframework.org/schema/p"

       xmlns:xsi="http://www.w3.org/2001/XMLSchema-instance"
       xsi:schemaLocation="http://www.springframework.org/schema/beans http://www.springframework.org/schema/beans/spring-beans.xsd">
<!--    p命名空间注入-->
    <bean id="emailDao" class="leftover.dao.EmailDao" p:address="shicheng666" p:name="zwc666"/>
    <bean id="person" class="leftover.dao.Person"
          p:names="{'1','23','323ahgha'}"
    />
</beans>c命名空间注入
c命名空间注入是针对构造函数注入的,为了简化构造函数注入,需要添加c命名注入的的约束文件
xml
<?xml version="1.0" encoding="UTF-8"?>
<beans xmlns="http://www.springframework.org/schema/beans"
       <!-- 需要添加c命名注入的的约束文件 -->
       xmlns:c="http://www.springframework.org/schema/c"

       xmlns:xsi="http://www.w3.org/2001/XMLSchema-instance"
       xsi:schemaLocation="http://www.springframework.org/schema/beans http://www.springframework.org/schema/beans/spring-beans.xsd">


    <bean id="userDao" class="leftover.dao.UserDao"/>
    <bean id="vipDao" class="leftover.dao.VipDao"/>
<!--    c命名空间注入-->
    <bean id="userService" class="leftover.service.UserService" c:userDao-ref="userDao" c:vipDao-ref="vipDao" />

</beans>util命名空间注入
xml
<?xml version="1.0" encoding="UTF-8"?>
<beans xmlns="http://www.springframework.org/schema/beans"
       xmlns:xsi="http://www.w3.org/2001/XMLSchema-instance"
     <!-- util命名空间注入要加入的配置 -->
       xmlns:util="http://www.springframework.org/schema/util"

       xsi:schemaLocation=
               "http://www.springframework.org/schema/beans http://www.springframework.org/schema/beans/spring-beans.xsd

				<!-- util命名空间注入要加入的配置 -->
                http://www.springframework.org/schema/util http://www.springframework.org/schema/util/spring-util.xsd"
>
<!--    可以直接复用这个-->
    <util:properties id="jdbc_properties">
        <prop key="username">zwc</prop>
        <prop key="password">123456</prop>
        <prop key="drive">jdbc</prop>
    </util:properties>

    <bean id="mysqlJdbc" class="leftover.dao.MysqlJdbc">
<!--        直接复用上面定义好的-->
        <property name="properties"  ref="jdbc_properties">
        </property>
    </bean>

    <bean id="oraceJdbc" class="leftover.dao.OraceJdbc" >
        <!--        直接复用上面定义好的-->
        <property name="properties" ref="jdbc_properties"/>
     </bean>
</beans>自动装配
自动装配包含根据类型和根据名字自动装配,都是基于set注入实现的
xml
<!--    自动装配包含根据类型和根据名字自动装配,都是基于set注入实现的-->
<!--根据名字自动装配-->
    <bean id="userService" class="leftover.service.UserService" autowire="byName" />
<!--    需要被装入的bean 的id 不能随便取 ,要根据set方法的方法名取-->
<!--    例如 UserService 的set方法的方法名分别为setUserDao 和setVipDao ,则id 分别为userDao 和vipDao-->

<!--    根据类型自动装配-->
<!--    ⚠️ 根据类型自动装配 同一种类型的bean只能存在一个,否则会出错-->
    <bean id="userService1" class="leftover.service.UserService" autowire="byType"/>

    <bean id="userDao" class="leftover.dao.UserDao"/>
<bean id="vipDao" class="leftover.dao.VipDao"/>引入外部的配置文件
xml
<?xml version="1.0" encoding="UTF-8"?>
<beans xmlns="http://www.springframework.org/schema/beans"
        <!--       需要引入的schema-->
       xmlns:context="http://www.springframework.org/schema/context"

       xmlns:xsi="http://www.w3.org/2001/XMLSchema-instance"
       xsi:schemaLocation="http://www.springframework.org/schema/beans http://www.springframework.org/schema/beans/spring-beans.xsd
        <!--       需要引入的schema-->
       http://www.springframework.org/schema/context http://www.springframework.org/schema/context/spring-context.xsd"
>

    <!--    引入外部的properties配置资源 可以使用${xxx} 来使用配置文件中的value-->
    <context:property-placeholder location="jdbc.properties"/>

    <bean id="user" class="leftover.dao.User">
<!--        使用配置文件中的value-->
        <property name="password" value="${password}"/>
        <property name="username" value="${username}"/>
    </bean>
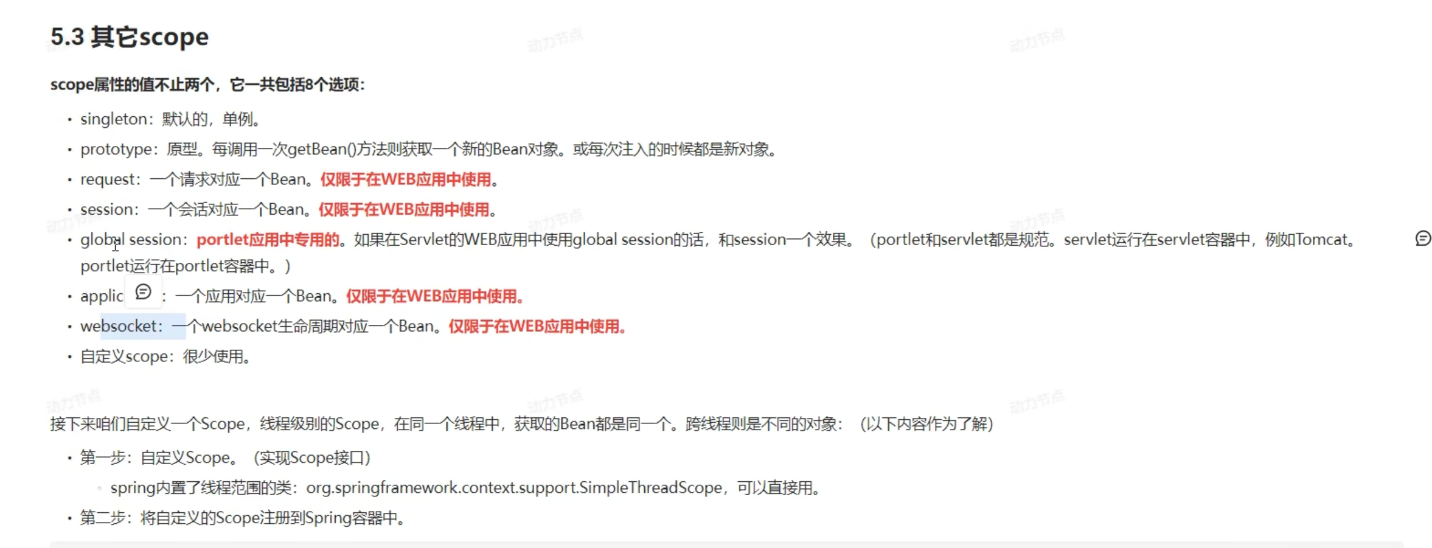
</beans>Bean作用域
默认是singleton ,即只会在spring 上下文初始化的时候创建bean,一次性创建所有的bean,调用getBean方法的时候,返回那个单例对象
prototype模式 这时候bean是多例的,spring上下文初始化的时候不会创建bean,只有调用getBean方法时才会创建bean,每次都会创建一个新的bean
xml
<?xml version="1.0" encoding="UTF-8"?>
<beans xmlns="http://www.springframework.org/schema/beans"
       xmlns:xsi="http://www.w3.org/2001/XMLSchema-instance"
       xsi:schemaLocation="http://www.springframework.org/schema/beans http://www.springframework.org/schema/beans/spring-beans.xsd">

    <!--  singleton模式(默认) Spring是在spring上下文初始化的时候实例化bean的,一次性创建所有的bean,调用getBean方法的时候,返回那个单例对象-->
    <!--   prototype模式  这时候bean是多例的,spring上下文初始化的时候不会创建bean,只有调用getBean方法时才会创建bean,每次都会创建一个新的bean -->

  	<bean id="user1" class="leftover.dao.User" scope="prototype"/>


  <!--使用自定义scope -->
    <bean id="user" class="leftover.dao.User" scope="myThread"/>


<!--    自定义scope 要实现Scope接口 ,org.springframework.context.support.SimpleThreadScope类是spring内置的线程范围的类-->
    <bean class="org.springframework.beans.factory.config.CustomScopeConfigurer">
        <property name="scopes">
          <!-- 这里是map,可以自定义多个scope-->
            <map>
                <entry key="myThread">
<!--            指定实现了Scope接口的类        -->
                    <bean class="org.springframework.context.support.SimpleThreadScope"/>
                </entry>
            </map>
        </property>
    </bean>
</beans>Bean的实例化方式
- 第一种方式是最常用的那种方式,这里不做赘述
第二种方式(简单工厂模式)
xml
    <!--    第二种方式,简单工厂模式, 在配置文件文件中指定哪个类的哪个方法获取Bean-->
    <!--    ⚠️ 这种方式 factory-method 必须是静态方法-->
<bean id="person" class="leftover.bean的实例化方式.PersonFactory" factory-method="getPersonInstance"/>对应的测试代码
java
     	  ClassPathXmlApplicationContext applicationContext = new ClassPathXmlApplicationContext("bean的实例化方式.xml");
        Person person = applicationContext.getBean("person", Person.class);
System.out.println(person);第三种方式(工厂方法模式)
xml
  <!--    第三种 和第二种方式很像,区别就是第二种方式提供的工厂方法是静态的,而这种方式提供的工厂方法是一个成员方法-->
    <bean id="shoesFactory" class="leftover.bean的实例化方式.ShoesFactory"/>  <!-- 配置工厂类-->
<bean id="shoes" factory-bean="shoesFactory" factory-method="getShoesInstance"/> <!-- 指定工厂bean, 以及工厂方法-->对应的测试代码
java
        ClassPathXmlApplicationContext applicationContext = new ClassPathXmlApplicationContext("bean的实例化方式.xml");
        Shoes shoes = applicationContext.getBean("shoes", Shoes.class);
System.out.println(shoes);第四种方式(通过实现BeanFactory接口的方式)
xml
 <!--    第四种方式,工厂类要实现FactoryBean接口-->
<bean id="clothes" class="leftover.bean的实例化方式.ClothesFactory"/>对应的测试方法
java
    		ClassPathXmlApplicationContext applicationContext = new ClassPathXmlApplicationContext("bean的实例化方式.xml");
        Clothes clothes = applicationContext.getBean("clothes", Clothes.class);
System.out.println(clothes);BeanFactory 和FactoryBean的区别
BeanFactory 是 Spring 框架的核心接口,用于管理和提供 Bean 实例。它是一个工厂模式的实现,负责创建、配置和管理 Bean 对象。BeanFactory 是 Spring IoC 容器的基础,它可以从配置元数据(如 XML 文件)中读取 Bean 的定义,并在需要时实例化和提供这些 Bean。
在Spring中有两种Bean,一种是普通的Bean,一种是工厂bean(可以辅助spring来实例化其他的bean对象)
FactoryBean是一种特殊的Bean(工厂Bean),它是一个工厂对象,用于创建和管理其他 Bean 的实例。FactoryBean 接口定义了一种创建 Bean 的方式,它允许开发人员在 Bean 的创建过程中进行更多的自定义操作。通过实现 FactoryBean 接口,开发人员可以创建复杂的 Bean 实例,或者在 Bean 实例化之前进行一些额外的逻辑处理。
Bean生命周期
Bean生命周期7步
- 实例化Bean
- Bean属性赋值
- 初始化前(执行BeanPostProcessor的before方法)(需要实现BeanPostProcessor接口并在xml配置文件中配置)
- 初始化Bean
- 初始化后 (执行BeanPostProcessor的aftre方法)(需要实现BeanPostProcessor接口并在xml配置文件中配置)
- 使用Bean
- 销毁Bean
Bean生命周期10步
- 实例化Bean
- Bean属性赋值
- 初始化前(执行BeanPostProcessor的before方法)(需要实现
BeanPostProcessor接口) - 初始化Bean
- 初始化后 (执行BeanPostProcessor的aftre方法)(需要实现
BeanPostProcessor接口) - 使用Bean
- 销毁Bean
点位1:在“bean后处理器”的before方法之前,检查是否实现了Aware相关的接口,若实现了则调用这些接口中的方法,分别有BeanNameAware,BeanClassLoaderAware,BeanFactoryAware接口
点位2:在“bean后处理器” before之后,检查是否实现了InitializingBean ,若实现了 则调用接口中的方法
点位3: 销毁Bean之前,检查是否实现了DisposableBean接口,若实现了,则调用接口中的方法
xml
  <!--  LoggerBeanPostProcessor需实现BeanPostProcessor接口  配置bean的后处理器 ,对该配置文件中的所有的bean都会生效-->
    <bean class="leftover.bean的生命周期.LoggerBeanPostProcessor"/>

    <!--            配置bean和初始化bean的时候会执行的方法的方法名以及销毁bean的时候会执行的方法的方法名-->
    <bean id="user" class="leftover.bean的生命周期.User" init-method="initBean" destroy-method="destroyBean">
        <property name="name" value="zwc"/>
</bean>singleton作用域和 prototype作用域下生命周期的不同
只有在singleton作用域下,spring 容器才会帮我们管理bean的全部生命周期,在prototype作用域下只有前8步,销毁bean之前和销毁bean的这两步并不会执行
将自己创建的对象纳入spring容器的管理
java
import leftover.bean的实例化方式.Person;
import org.junit.jupiter.api.Test;
import org.springframework.beans.factory.support.DefaultListableBeanFactory;

public class 将自己创建的对象纳入spring容器的管理 {
    @Test
    public void test() {
        Person person = new Person();
        System.out.println(person);
//        将自己创建的对象纳入spring容器的管理
        DefaultListableBeanFactory factory = new DefaultListableBeanFactory();
        factory.registerSingleton("person", person);
//获取bean对象
        Person person1 = factory.getBean("person", Person.class);
        System.out.println(person1); //同一个对象
    }
}Spring解决循环依赖问题
只有在set注入的情况下,且两个bean中至少有一个的作用域为
singleton时,不会发生循环依赖若为构造函数注入,或者两个bean的作用域均为
prototype时,会发生循环依赖spring为什么可以解决set+singleton模式下循环依赖的问题?
spring使用了三级缓存的机制取解决循环依赖的问题,spring将
实例化bean和给bean赋值这两个动作分开取完成一级缓存:
singleotonObjects存储的是初始化完之后完整的单例bean对象二级缓存:
earlySingletonObjects存储的是早期的单例bean对象,这个缓存中的bean对象的属性没有被赋值三级缓存:
singletonFactories存储的是单例工厂对象,这个里面存储了大量的“工厂对象”,每个单例Bean对象都会对应一个单例工厂对象例如A中属性引用了B,B中的属性引用了A,那么是如何解决循环依赖问题的?
答:A首先实例化,并将自己曝光到singletonFactories缓存中,再对属性赋值,这时候发现A引用了B,然后然后get(B),发现B没创建,则创建B对象,然后对其属性赋值,发现B依赖于A,这时A已经创建,会先从一级缓存中找A,没找到,再从二级缓存中找A,还是没找到,最后再从三级缓存中找到A对应的工厂对象,调用其getObject方法返回A对象,然后完成B的属性赋值,最后完成B的初始化。这时候B已经创建好了,因此A的属性赋值也能顺利完成,再完成A的初始化。
java
	protected void addSingletonFactory(String beanName, ObjectFactory<?> singletonFactory) {
		Assert.notNull(singletonFactory, "Singleton factory must not be null");
		synchronized (this.singletonObjects) {
      //如果一级缓存中没有这个bean,因此新创建的bean都会有一个singletonFactory
			if (!this.singletonObjects.containsKey(beanName)) {
        //则先曝光这个bean
				this.singletonFactories.put(beanName, singletonFactory);
				this.earlySingletonObjects.remove(beanName);
				this.registeredSingletons.add(beanName);
			}
		}
	}

//获取单例bean
	protected Object getSingleton(String beanName, boolean allowEarlyReference) {

		singletonObject = this.singletonObjects.get(beanName);
    //如果一级缓存中没有
					if (singletonObject == null) {
						singletonObject = this.earlySingletonObjects.get(beanName);
            //如果二级缓存中没有
						if (singletonObject == null) {
              //从三级缓存中取对应的单例工厂对象
							ObjectFactory<?> singletonFactory = this.singletonFactories.get(beanName);
              //若这个工厂对象存在
							if (singletonFactory != null) {
                //调用getObject获得一个单例bean ,并将其加入二级缓存
								singletonObject = singletonFactory.getObject();
								this.earlySingletonObjects.put(beanName, singletonObject);
                //最后将这个单例工厂对象从三级缓存中删掉
								this.singletonFactories.remove(beanName);
							}
						}
}Spring IoC注解
声明bean的注解
@Component,@Controller,@service,@Repository,其他三个注解都是@Component注解的别名,这样设计是为了增加程序的可读性Dao层使用
@Repository,Service层使用@service,controller层使用@Controller注解声明Bean注解的使用
⚠️需要引入context命名空间
xml<?xml version="1.0" encoding="UTF-8"?> <beans xmlns="http://www.springframework.org/schema/beans" xmlns:context="http://www.springframework.org/schema/context" xmlns:xsi="http://www.w3.org/2001/XMLSchema-instance" xsi:schemaLocation="http://www.springframework.org/schema/beans http://www.springframework.org/schema/beans/spring-beans.xsd http://www.springframework.org/schema/context http://www.springframework.org/schema/context/spring-context.xsd" > <!-- 配置注解的扫描包,多个包使用逗号隔开--> <context:component-scan base-package="leftover.SpringIoC注解的使用.Dao,leftover.SpringIoC注解的使用.Service"/> <!--多个包也可以配置为多个包的公共父类,例如下面:不过这样会增加程序的开销--> <context:component-scan base-package="leftover.SpringIoC注解的使用" /> </beans>
⚠️ 若没有指定value,即这样声明@Repository ,则Bean的id默认为类名首字母小写
java
//⚠️ 若没有指定value,即这样声明@Repository ,则Bean的id默认为类名首字母小写
@Repository("userBean")
public class User {
}让部分注解生效
xml
<!--    下面的配置中,只有Controller注解失效-->
    <context:component-scan base-package="leftover.SpringIoC注解的使用.Dao,leftover.SpringIoC注解的使用.Service"
                            use-default-filters="true">
        <!--        让Controller注解失效-->
        <context:exclude-filter type="annotation" expression="org.springframework.stereotype.Controller"/>
    </context:component-scan>


    <!--    use-default-filters="false" 则所有注解都失效,默认为true-->
		<!--下面配置只会让Controller注解生效 -->
    <context:component-scan base-package="leftover.SpringIoC注解的使用.Dao,leftover.SpringIoC注解的使用.Service"
                            use-default-filters="false">
<!--        让Controller注解生效-->
        <context:include-filter type="annotation" expression="org.springframework.stereotype.Controller"/>
</context:component-scan>负责注入的注解
- 包括
@Value,@AutoWired,@Qualifier,@Resource,这几个注解是用来给Bean属性赋值的
@Value注解
- 负责基本数据类型的注入,可以使用在属性上,构造函数的参数上,set方法上。⚠️使用在属性上时,可以不声明set方法
@AutoWired 和@Qualifier
- @AutoWired可以用来注入非简单类型,用法和@Value差不多。单独使用@AutoWired,默认根据
类型装配(若扫描包中存在两个或以上相同类型的bean,则会报错) - 使用@Qualifier来指定要装入的Bean的名称
java
    @Autowired
    @Qualifier("oraceBean")
private Db db;@Resource
@Resource注解也可以完成非简单类型的注入,与AutoWired类似
二者的区别?
- @Resource注解是jdk扩展包中的,属于jdk的一部分 ,而@AutoWired注解是spring框架自己的
- @Resource注解默认是按名字装配,未指定name时,使用属性名作为name,通过name找不到的话会自动通过类型装配 。 而@AutoWired注解默认通过类型装配,如果想通过名字装配,需要配合@Qualifier注解一起使用
- @Resource注解 可以使用在属性上,set方法上。 @AutoWired注解 可以使用在属性上,set方法上,构造方法上,构造方法的参数上
使用Resource注解,需要引入(spring6)
xml<dependency> <groupId>jakarta.annotation</groupId> <artifactId>jakarta.annotation-api</artifactId> <version>2.1.1</version> </dependency>
全注解开发
@Configuration注解声明一个配置类,@ComponentScan 注解配置对哪些包进行扫描
java
@Configuration("appConfig")
@ComponentScan(value = {"leftover.SpringIoC注解的使用"})
public class AppConfig {
    public static void main(String[] args) {
      // 通过注解配置类的方式创建ApplicationContext对象
        AnnotationConfigApplicationContext applicationContext = new AnnotationConfigApplicationContext(AppConfig.class);

        CartService cartServiceBean = applicationContext.getBean("cartServiceBean", CartService.class);
        System.out.println(cartServiceBean);
    }
}AOP(Aspect Oriented Programing)
什么是切面?
切面就是在业务流程中与业务无关的那些通用代码。例如日志、事务管理、安全等系统服务,这些系统服务被称为交叉业务
一句话总结AOP:将与核心业务无关的代码独立地抽取出来,形成一个独立的组件,然后以横向交叉的方式应用到业务流程当中的过程被称为AOP。
AOP的优点:
- 代码复用性强
- 代码易维护
- 使开发者更关注业务逻辑
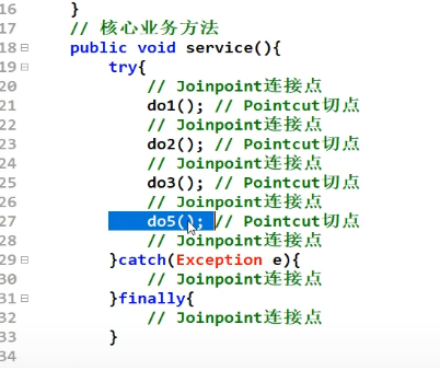
AOP中的七大术语
连接点(JoinPoint):在程序的整个执行流程中,可以织入切面的位置。例如方法的前后,catch的位置,finally的位置
切点(Pointcut):在程序执行流程中,真正织入切面的方法(即切点是方法)
通知(Advice):通知又叫增强,就是具体你要织入的代码。
通知包括:
- 前置通知
- 后置通知
- 环绕通知
- 异常通知
- 最终通知
切面(Aspect):切点+通知就是切面
织入(Weaving):把通知应用到目标对象上的过程
代理对象(Proxy):一个目标对象被织入通知后产生的新对象
目标对象(Target):被织入通知的对象
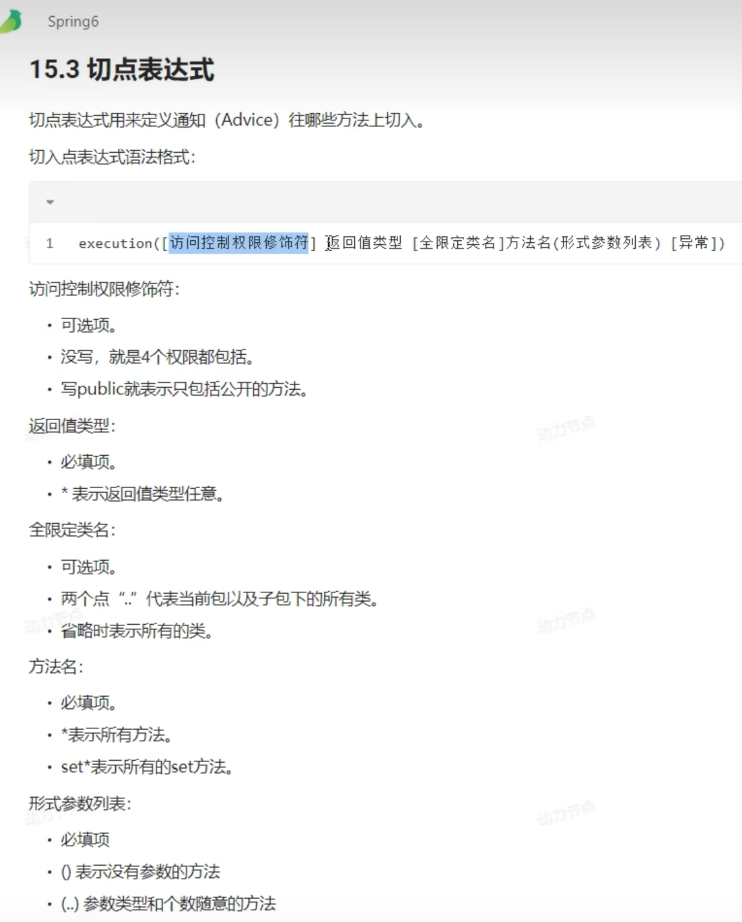
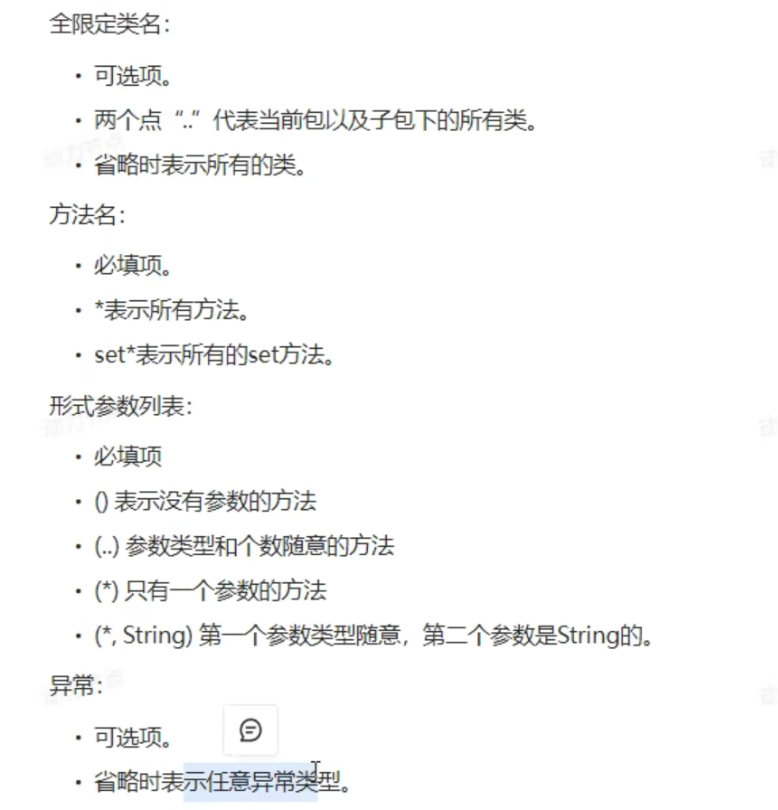
切点表达式
通知类型
通知类型:
- 前置通知:@Before 目标方法执行之前的通知
- 后置通知:@AfterReturning 目标方法执行之后的通知
- 环绕通知:@Around 目标方法之前添加通知,同时目标方法执行之后添加通知
- 异常通知:@AfterThrowing 发生异常之后执行的通知
- 最终通知:@After 放在finally语句块中的通知
执行顺序:环绕前-> 前置通知-> 执行业务代码 -> 后置通知 -> 最终通知 -> 环绕后
若有异常:环绕前-> 前置通知-> 执行业务代码 -> 异常通知-> 最终通知
若在环绕通知中捕获了异常:环绕前-> 前置通知-> 执行业务代码 -> 异常通知-> 最终通知 -> 环绕后
java
@Component
//声明这个类为切面
@Aspect
public class LoggerAspect {
    //前置通知
//    @Before("execution(* leftover.aop.service..*(..))")
//    以logi为开头的所有方法
    @Before("execution(* leftover.aop.service..logi*(..))")
    public void logger() {
        System.out.println("执行代码前");
    }

    //后置通知
    @AfterReturning("execution(* leftover.aop.service..logi*(..))")
    public void afterReturningAdvice() {
        System.out.println("后置通知");
    }

    //    环绕通知
    @Around("execution(* leftover.aop.service..logi*(..))")
    public void aroundAdvice(ProceedingJoinPoint proceedingJoinPoint) {
        System.out.println("环绕前");
          try {
              proceedingJoinPoint.proceed();
          } catch (Throwable e) {
              System.out.println(e);
          }
        System.out.println("环绕后");
    }

    //    最终通知
    @After("execution(* leftover.aop.service..logi*(..))")
    public void afterAdvice() {
        System.out.println("最终通知");
    }

    @AfterThrowing("execution(* leftover.aop.service..logi*(..))")
    public void afterThrowingAdvice() {
        System.out.println("异常通知");
    }
}JoinPoint 参数
每个通知都可以写一个JoinPoint joinPoint参数,这个参数是spring传递过来的,可以使用这个对象获取一些方法信息
java
   //    每个通知的参数都可以写一个JoinPoint,这个参数是spring传递过来的,可以用这个对象获取一些方法的信息之类的
    @After("execution(* leftover.aop.service..logi*(..))")
    public void afterAdvice(JoinPoint joinPoint) {
        System.out.println(joinPoint.getSignature().getName()); //login
        System.out.println("最终通知");
}切面的顺序
可以使用@Order注解标记切面的顺序,数字越小优先级越高
通用切点
每个通知都要写切点表达式,这样很繁琐,可以使用注解@Pointcut定义好一些切点,后面就可以直接复用
例如
java
public class CommonPointCut {
  //定义一个切点
    @Pointcut("execution(* leftover.aop.service..logi*(..))")
    public void allMethod() {
    }
}java
    //使用定义好的切点,需指定对应的类名和方法名
		//可以传入多个切点 使用|| 运算符
    @Before("leftover.aop.pointcut.CommonPointCut.allMethod()|| xxx")
    public void logger(JoinPoint joinPoint) {
        System.out.println("执行代码前");
}Spring对事务的管理
Spring实现事务的两种方式
编程式事务: 通过编写代码的方式实现事务的管理,可以通过aop来实现对事务的管理
声明式事务: 基于注解方式(使用注解的方式来使用)
基于XML配置方式
PlatformTransactioManager接口:spring事务管理器的核心接口。其他框架若想要spring帮他进行事务的管理,只需实现这个接口即可
Spring6中也有两个实现:
- DataSourceTransactionManager: 支持JdbcTemplate、Mybatis、Hibernate等事务管理
- JtaTransactionManager:支持分布式事务管理
xml
<?xml version="1.0" encoding="UTF-8"?>
<beans xmlns="http://www.springframework.org/schema/beans"
       xmlns:context="http://www.springframework.org/schema/context"
       xmlns:tx="http://www.springframework.org/schema/tx"
       xmlns:xsi="http://www.w3.org/2001/XMLSchema-instance"
       xsi:schemaLocation="http://www.springframework.org/schema/beans http://www.springframework.org/schema/beans/spring-beans.xsd
                            http://www.springframework.org/schema/context http://www.springframework.org/schema/context/spring-context.xsd
                            http://www.springframework.org/schema/tx http://www.springframework.org/schema/tx/spring-tx.xsd
">
    <context:component-scan base-package="leftover.spring对事务的管理"/>

<!--    配置dataSource-->
    <bean id="dataSource" class="com.alibaba.druid.pool.DruidDataSource">
        <property name="username" value="root"/>
        <property name="password" value="zwc666666"/>
        <property name="url" value="jdbc:mysql://localhost:3306/study_java"/>
        <property name="driverClassName" value="com.mysql.cj.jdbc.Driver"/>
    </bean>

<!--    配置jdbcTemplate-->
    <bean id="jdbcTemplate" class="org.springframework.jdbc.core.JdbcTemplate">
<!--        指定dataSource-->
        <property name="dataSource" ref="dataSource"/>
    </bean>

    <!--    配置事务管理器-->
    <bean id="txManager" class="org.springframework.jdbc.datasource.DataSourceTransactionManager">
        <property name="dataSource" ref="dataSource"/>
    </bean>

<!--    配置事务注解驱动器-->
    <tx:annotation-driven transaction-manager="txManager"/>

</beans>配置完成之后,只需使用@Transactional注解哪个方法上有事务,也可以声明在类上,若声明在类上,则该类上的所有方法都会进行事务的管理
java
@Service("accountService")
public class AccountServiceImpl implements AccountService {
    @Resource(name = "accountDao")
    AccountDao accountDao;

    @Transactional
    @Override
    public void transfer(int fromId, int toId, double balance) {

        Account fromAccount = accountDao.selectById(fromId);
        if (fromAccount.getBalance() < balance) {
            throw new RuntimeException("余额不足");
        }
        Account toAccount = accountDao.selectById(toId);

        fromAccount.setBalance(fromAccount.getBalance() - balance);
        toAccount.setBalance(toAccount.getBalance() + balance);

        int count = accountDao.update(fromAccount);
        String s=null;
        s.toString();
        count += accountDao.update(toAccount);
        if (count<2) {
            throw  new RuntimeException("转账失败,联系银行");
        }

        System.out.println("转账成功");
    }
}事务的传播行为
什么是事务的传播行为 ?
举个栗子:在service类中有a方法和b方法,a方法上有事务,b方法上也有事务,a方法中调用了b方法,那么事务是如何传递的?合并到一个事务里?还是开启一个新的事务?这就是事务的传播行为。
使用
propagation属性指定事务的传播行为java@Transactional(propagation = Propagation.REQUIRED)spring传播行为共7种
- REQUIRED:当前有事务,则加入当前的事务。当前没有事务,则新建一个事务
- SUPPORTS:当前有事务,则加入当前的事务。当前没有事务,则以非事务的方式执行
- MANDATORY:如果当前有事务,则加入当前的事务。当前没有事务,则抛出异常
- REQUIRES_NEW:不管当前有没有事务,都直接开启一个新事物。⚠️开启的新事物和之前的事务不存在嵌套关系,之前的事务被挂起
- NOT_SUPPORTED: 无论当前有没有事务,都以非事务方式运行。若当前有事务,则挂起当前事务。(即不支持事务)
- NEVER:无论当前有没有事务,都以非事务方式运行。若当前有事务,则抛出异常
- NESTED:若当前有事务,则在这个事务中嵌套一个完全独立的事务,嵌套的事务与原事务无关,可以独立地提交和回滚。若当前没有事务,则新建一个事务
事务的隔离级别
什么是事务的隔离级别?
多个事务并发执行时,一个事务对其他事务的可见性,以及对其他事务的影响程度
数据库中读取数据存在的三大问题
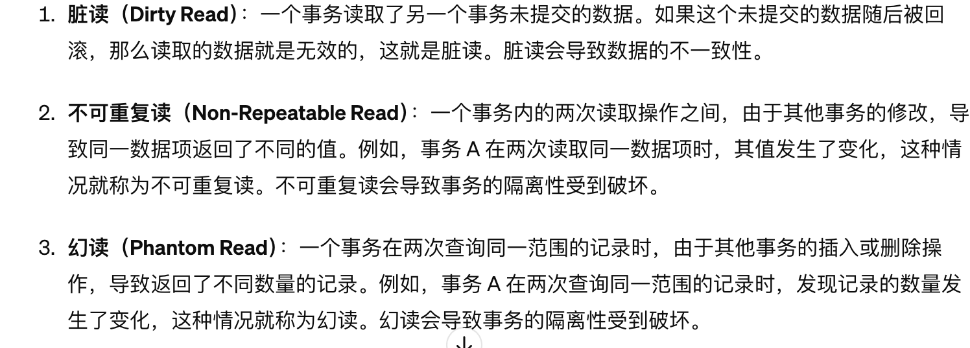
幻读(图片中对幻读的解释有问题):即当一个事务读取某个表时,另一个事务更新了这个表(即这个事务没有意识到有别的事务正在修改数据),没有发现数据的变化。
幻读问题解决:并发情况下并不能解决幻读的问题,要解决幻读问题,可以加锁,使两个事务先后执行
事务的四个隔离级别
(MYSQL 中默认的事务隔离级别为可重复读)读未提交(READ_UNCOMMITTED) :一个事务可以读取另一个事务未提交的数据。
读提交(READ_COMMITTED):一个事务职能读取已经提交的其他事务的数据
可重复读(REPEATABLE_READ):在同一个事务中多次读取同一数据,结果都是一致的
序列化(SERIALIZABLE):最高隔离级别,确保每个事务都完全看不到其他事务的影响。它通过对事务进行序列化执行来避免脏读、不可重复读和幻读问题,但是会降低并发性能。(数据在执行事务期间被别的事务修改了,那么事务会暂停,等待别的事务执行完成,获取最新的数据)

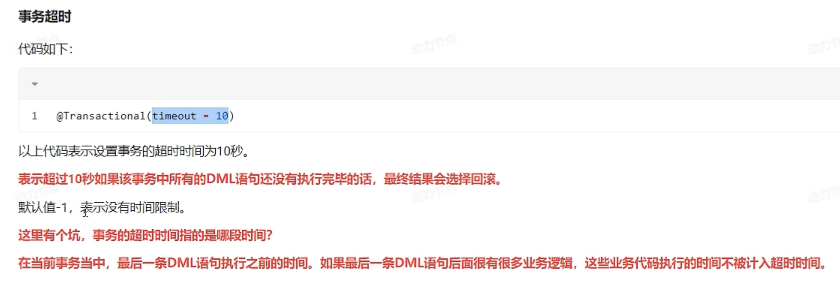
事务超时
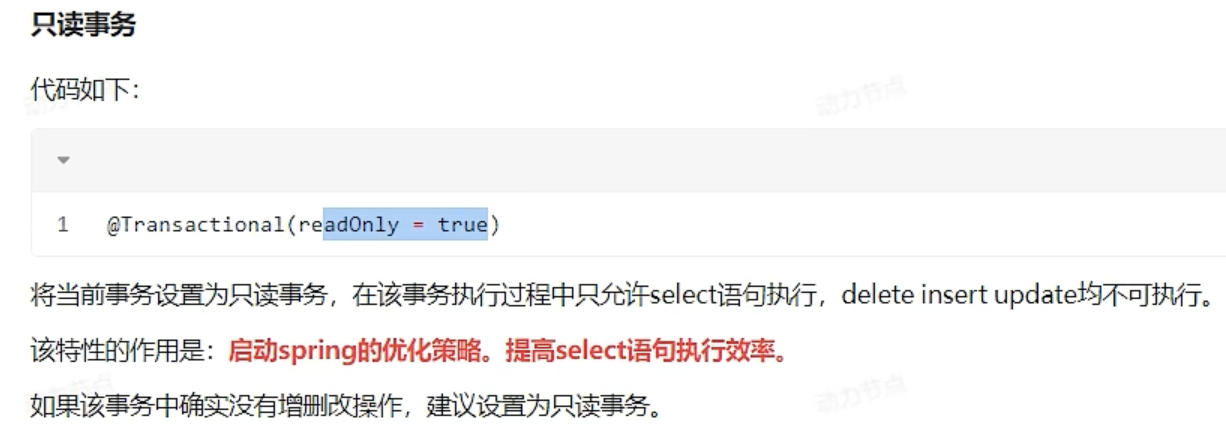
只读事务
遇到某些异常才回滚 || 遇到某些异常不回滚
java
//只有遇到下面的异常及其子类才会回滚
@Transactional(rollbackFor = RuntimeException.class)

//遇到下面的异常及其子类不回滚
@Transactional(noRollbackFor = RuntimeException.class)无效事务
- spring事务处理是AOP的环绕通知,只有通过代理对象调用具有事务的方法时,这个事务才能生效。例如:类中有A方法(无事务),A中调用带有事务的B方法。那么最终我们调用A方法时,B方法中的事务不会生效。
⚠️当然,protected,private方法默认是没有事务功能的
- 方法在线程中运行,在统一线程中方法具有事务功能,但是在新的线程中,事务无效。例如方法A带有事务,里面有一个新的线程执行的一些数据库操作,那么新线程中的事务无效
全注解开发
java
@Configuration
@ComponentScan("leftover.spring对事务的管理")
//启动事务管理器
@EnableTransactionManagement
public class AppConfig {
  //配置dataSource 的bean
    @Bean(name = "dataSource")
    public DruidDataSource getDruidDataSource() {
        DruidDataSource druidDataSource = new DruidDataSource();
        druidDataSource.setUsername("root");
        druidDataSource.setPassword("zwc666666");
        druidDataSource.setUrl("jdbc:mysql://localhost:3306/study_java");
        druidDataSource.setDriverClassName("com.mysql.cj.jdbc.Driver");
        return druidDataSource;
    }


    @Bean("jdbcTemplate")
    public JdbcTemplate getJdbcTemplate(@Autowired @Qualifier("dataSource") DataSource dataSource) {
        return new JdbcTemplate(dataSource);
    }

    @Bean(name = "txManager")
    @Primary
    public DataSourceTransactionManager getDataSourceTransactionManager(@Autowired @Qualifier("dataSource") DataSource dataSource) {
        return new DataSourceTransactionManager(dataSource);
    }
}Spring 对其他工具的支持
Spring对Junit对支持
首先pom.xml要引入这个包
xml
<!--        spring对junit的支持-->
        <dependency>
            <groupId>org.springframework</groupId>
            <artifactId>spring-test</artifactId>
            <version>6.1.5</version>
            <scope>test</scope>
</dependency>测试文件中:
java
//junit4这样子配置
@RunWith(SpringJUnit4ClassRunner.class)
//junit5这样配置
@ExtendWith(SpringExtension.class)

//指定配置文件的路径(junit5和4都要配置)
@ContextConfiguration("classpath:spring对junit对支持.xml")
public class Spring对junit4的支持Test {
  //现在的写法
    @Autowired
    @Qualifier("user")
    private User user;  //直接注入进来
    @Test
    public void testForjunit() {
        System.out.println(user.getName()); //测试方法中直接使用就像
    }
  //    以前的写法
    @Test
    public void testForNone() {
        ClassPathXmlApplicationContext applicationContext = new ClassPathXmlApplicationContext("spring对junit对支持.xml");
        User user1 = applicationContext.getBean("user", User.class);
        System.out.println(user1.getName());
    }
  }
}Spring对Mybatis对支持
xml
	<!-- 首先引入这两个依赖-->
			<dependency>
            <groupId>org.mybatis</groupId>
            <artifactId>mybatis-spring</artifactId>
            <version>3.0.3</version>
        </dependency>
        <!-- https://mvnrepository.com/artifact/org.mybatis/mybatis -->
        <dependency>
            <groupId>org.mybatis</groupId>
            <artifactId>mybatis</artifactId>
            <version>3.5.11</version>
</dependency>然后可以将很多mybatis的配置文件的很多东西放到spring的配置文件中
xml
<!-- spring-config.xml-->

<!--    配置组件扫描-->
    <context:component-scan base-package="leftover"/>
    <!--    引入外部的配置文件-->
    <context:property-placeholder location="db.properties"/>
    <!--    配置数据源-->
    <bean id="dataSource" class="com.alibaba.druid.pool.DruidDataSource">
        <property name="driverClassName" value="${db.driver}"/>
        <property name="url" value="${db.url}"/>
        <property name="username" value="${db.username}"/>
        <property name="password" value="${db.password}"/>
    </bean>

    <!--    配置mybatis的SqlSessionFactoryBean ,用来创建sqlSession对象 -->
    <bean class="org.mybatis.spring.SqlSessionFactoryBean">
        <property name="dataSource" ref="dataSource"/>
        <!--        mybatis的配置文件位置-->
        <property name="configLocation" value="mybatis-config.xml"/>
        <!--        配置pojo的类型别名-->
        <property name="typeAliasesPackage" value="leftover.pojo"/>
    </bean>

    <!--    配置mapper的扫描-->
    <bean class="org.mybatis.spring.mapper.MapperScannerConfigurer">
        <property name="basePackage" value="leftover.mapper"/>
    </bean>

    <!--    配置事务管理器-->
    <bean id="tx-manager" class="org.springframework.jdbc.datasource.DataSourceTransactionManager">
        <property name="dataSource" ref="dataSource"/>
    </bean>

    <!--    启动事务注解驱动-->
<tx:annotation-driven proxy-target-class="true" transaction-manager="tx-manager"/>之后一些myabtis的一些全局的配置需要在mybatis-config.xml文件中配置,例如
之后按照spring的方式使用依赖注入的方式进行开发即可
文章作者:leftover
版权声明: 所有文章除特别声明外,均采用 CC BY-NC-SA 4.0 许可协议。转载请注明来自 leftover!