本站总访问量次
@SpringBootApplication注解
作者:leftover
字数统计:3.3k 字
阅读时长:20 分钟
@SpringBootConfiguration注解
包含@Configuration注解的功能
@EnableAutoConfiguration注解
开启自动配置,将spring和第三方库中的对象创建好,注入到spring容器,避免写xml,去掉样例代码
@ComponentScan 注解
组件扫描器,springboot约定:启动类作为扫描包的起点, 扫描启动类所在的及其子包中的所有的类(因此启动类应该放在最外面的包下)
@ConfigurationProperties注解 (将多个配置项绑定到Bean的属性上)
使用@Value注解绑定单个属性,当属性较多时不方便,springboot提供了另一种方法:@ConfigurationProperties注解,将多个配置项绑定到bean到属性上
⚠️Bean有无参构造方法,不支持static属性
@ConfigurationProperties 能配置多个简单类型属性,同时支持map、list、数组类型。对属性还能验证基本格式
启动
@ConfigurationProperties注解,在springboot的启动类上面加上@EnableConfigurationProperties或者@ConfigurationPropertiesScan- java
//启用对应类的@ConfigurationProperties注解
//@EnableConfigurationProperties({ 绑定Bean.class })

//配置@ConfigurationProperties注解的扫描
@ConfigurationPropertiesScan(basePackages = {"leftover.first_learn_springboot.service"})
java
@Data
public class Security {
    private String username;
    private String password;
}

// @Component
@Configuration(proxyBeanMethods = false)
@ConfigurationProperties(prefix = "app")
public class 绑定Bean {
    Integer port;
    String username;
    String password;
  //还可以嵌套
    Security security;
}yaml
app:
  username: zwc1-dev
  port: 8890
  password: zwc666
  security:
    username: root
password: zwc777绑定map ,list,array
java
@ConfigurationProperties(prefix = "app")
public class 绑定Bean {
    String[] names;
    List<Server> serverList;
    Map<String, User> users;
}对应的yml文件
yml
app:
  #数组
  names:
    - zwc
    - zwc2
    - zwc3
    # list<Server> serverList
  server-list:
    - name: zwc
      ip: 192.168.0.1
    - name: zwc
      ip: 192.168.0.1
  #map <String ,User> users
  users:
    user1:
      name: zwc
      age: 19
    user2:
      name: zwc88
age: 99使用@ConfigurationProperties注解将属性绑定到第三方的Bean
- 将某个方法使用 @Bean注解声明为一个Bean,再使用@ConfigurationProperties注解即可将属性绑定到第三方的Bean上面
java
    @ConfigurationProperties("jdbc")
    @Bean("myDataSource")
    public DruidDataSource creatDataSource() {
        return new DruidDataSource();
}yaml
jdbc:
  driverClassName: com.mysql.cj.jdbc.Driver
  username: root
  url: jdbc:mysql://localhost:3306/study_mybatis
password: zwc666666使用@PropertySource注解来指定配置源
springboot默认是会加载application-xxx的文件,若有其他单独的配置文件文件(默认不会加载),我们可以使用@PropertySource注解指定配置源,那么@Value注解,或者@ConfigurationProperties注解会从
指定的配置源中加载数据使用@PropertySource注解时,
必须将这个类声明为Bean,使用Component或者Configuration注解⚠️@PropertySource 注解默认支持指定xml,properties文件,如果要指定其他的文件格式(如yaml),需指定factory属性(指定的类需实现PropertySourceFactory接口,如下)
java
@Data
@Component
@ConfigurationProperties(prefix = "group")
@PropertySource(value = "classpath:/group.yaml", factory = YamlPropertySourceFactory.class)
public class BindBean2 {
    private String name;
    private String leader;
    private Integer numbers;
}实现PropertySourceFactory接口,可以加载yaml文件
java
import org.springframework.beans.factory.config.YamlPropertiesFactoryBean;
import org.springframework.core.env.PropertiesPropertySource;
import org.springframework.core.env.PropertySource;
import org.springframework.core.io.support.EncodedResource;
import org.springframework.core.io.support.PropertySourceFactory;
import java.io.IOException;
import java.util.Optional;
import java.util.Properties;

public class YamlPropertySourceFactory implements PropertySourceFactory {
    @Override
    public PropertySource<?> createPropertySource(String name, EncodedResource resource) throws IOException {
        String fileName = Optional.ofNullable(name).orElse(resource.getResource().getFilename());
        YamlPropertiesFactoryBean factory = new YamlPropertiesFactoryBean();
        factory.setResources(resource.getResource());
        Properties properties = factory.getObject();
        return new PropertiesPropertySource(fileName, properties);
    }
  // ⚠️ 也可以使用YamlPropertySourceLoader来实现,如下,会简洁很多
      @Override
    public PropertySource<?> createPropertySource(String name, EncodedResource resource) throws IOException {
        YamlPropertySourceLoader loader = new YamlPropertySourceLoader();
        List<PropertySource<?>> sourceList = loader.load(name, resource.getResource());
        return sourceList.get(0);

    }

}@ImportSource注解
一般情况下我们不需要使用xml来声明bean,但如果需要的话,可以在启动类上面加上如下注解可以将配置文件导入进来
java
@ImportResource(locations = {"classpath:spring_config.xml"})条件注解
条件注解可以基于自定义的条件来控制Bean的创建
@ConditionalOnxxx
例如
@ConditionalOnClass:如果类路径中存在这个类,就创建Bean
@ConditionalOnMissingClass:如果类路径中不存在这个类,就创建Bean
@ConditionalOnBean: 如果容器中存在这个Bean,就创建Bean
@ConditionalOnMissingBean: 如果容器中不存在这个Bean,就创建Bean,(若没有指定对应的类,则表示当前的Bean如果没有则创建,如果当前Bean存在,则不创建)
@@ConditionalOnProperty(name = {"leftover"}):根据配置文件或者环境变量中是否存在对应的属性来控制Bean的创建
自动装配
导入了starter,就会导入这个starter的
autoconfigure包autoconfigure包下面有一个文件META_INF/spring/org-springframework.boot.autoconfigure.AutoConfiguration.imports,里面指定的所有启动要加载的自动装配的类。例如mybatis-starterxmlorg.mybatis.spring.boot.autoconfigure.MybatisLanguageDriverAutoConfiguration org.mybatis.spring.boot.autoconfigure.MybatisAutoConfiguration@EnableAutoConfiguration注解会自动把上面文件里面所有的自动装配类都导入进来,xxxAutoConfiguration是有条件注解进行按需加载xxxAutoConfiguration 是一个配置类,里面会定义一些bean,这些bean会从xxxProperties类中提取属性值,xxxProperties类又使用
@ConfigurationProperties注解将属性值与配置文件绑定
日志
- 默认输出格式:
- 时间和日期:毫秒级精度
- 日志级别:FATAL,ERROR,WARN,INFO,DEBUG,TRACE,ALL,OFF
- 进程ID
- --- :消息分隔符
- 线程名:使用[]包含
- Logger名:通常是产生日志的类名
- 消息:日志记录的内容
springboot的日志默认级别为info
设置日志的级别
yamllogging: pattern: #日志中日期的格式 dateformat: yyyy-MM-dd level: # 针对某个类设置日志级别 leftover.first_learn_springboot.controller.HelloController: debug # 设置root的日志级别(默认info) root: INFO aaa: debug # 日志分组,将某些包或者某些类放到一个组下面,对这些包和类使用统一的日志规则 group: aaa: - leftover.first_learn_springboot.service - leftover.first_learn_springboot.controller自定义日志系统
导入starter,先将springboot默认的日志系统排除,再导入log4j2的starter
xml<dependency> <groupId>org.springframework.boot</groupId> <artifactId>spring-boot-starter</artifactId> <exclusions> <exclusion> <groupId>org.springframework.boot</groupId> <artifactId>spring-boot-starter-logging</artifactId> </exclusion> </exclusions> </dependency> <dependency> <groupId>org.springframework.boot</groupId> <artifactId>spring-boot-starter-log4j2</artifactId> </dependency>再编写配置文件
log4j2-spring.xml(推荐)或者log4j2.xml
使用mybatis和druid连接池
导入对应的starter
启动类加一个MapperScan的注解,配置在哪个包下面扫描
mapper接口java@SpringBootApplication @MapperScan("leftover.springbootmybatisdruid.mapper") public class SpringbootMybatisDruidApplication { public static void main(String[] args) { SpringApplication.run(SpringbootMybatisDruidApplication.class, args); } }- yml
spring:
  datasource:
  # 使用druid的数据源
    type: com.alibaba.druid.pool.DruidDataSource
    username: root
    url: jdbc:mysql://localhost:3306/study_mybatis
    password: zwc666666
    driver-class-name: com.mysql.cj.jdbc.Driver
mybatis:
#设置mybatis类型别名的包
  type-aliases-package: leftover.springbootmybatisdruid.pojo
  # 设置mapper配置文件的位置
  mapper-locations: classpath:/mapper/*.xml
Web场景
- springmvc的所有配置文件:
spring.mvc; web场景通用配置:spring.web; 文件上传配置:spring.servlet.multipart;服务器的配置:server
autoConfiguration
自动配置在Spring的默认值基础上增加了以下功能。
包含了
ContentNegotiatingViewResolver和BeanNameViewResolverBean。(视图解析器)支持为静态资源提供服务,包括对WebJars的支持(本文稍后将介绍)。

自动注册
Converter、GenericConverter和FormatterBean。(适配常见数据类型转化和格式化需求)支持
HttpMessageConverters。(消息处理器,可以方便返回json等数据类型)自动注册
MessageCodesResolver。(方便国际化以及错误消息处理)支持静态的
index.html。(欢迎页)自动使用
ConfigurableWebBindingInitializerbean。(实现消息处理、数据绑定、类型转化、数据检验等功能)
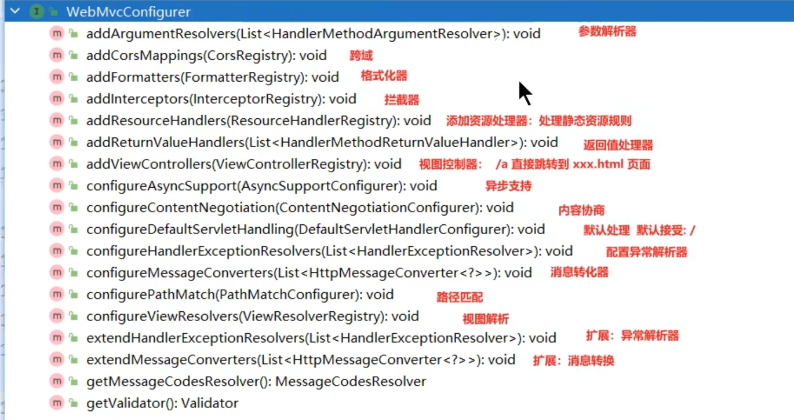
定义或者扩展功能:
如果你想保留那些Spring Boot MVC定制,并进行更多的 MVC定制(Interceptor、Formatter、视图控制器和其他功能),你可以添加你自己的
@Configuration类,类型为WebMvcConfigurer,但 不 含@EnableWebMvc。如果你想提供
RequestMappingHandlerMapping、RequestMappingHandlerAdapter或ExceptionHandlerExceptionResolver的自定义实例,并仍然保持Spring Boot MVC的自定义,你可以声明一个WebMvcRegistrations类型的bean,用它来提供这些组件的自定义实例。如果你想完全控制Spring MVC,你可以添加你自己的
@Configuration并使用@EnableWebMvc注解 ,或者添加你自己的@Configuration并使用DelegatingWebMvcConfiguration注解 ,如@EnableWebMvc的Javadoc中所述。
路径匹配
以前默认是ant风格的路径模式,即:
*: 表示任意数量的字符
?: 表示任意一个字符
** : 表示任意数量的目录
{}: 表示一个命名的模式占位符
[]: 表示字符集合,例如[a-z]表示小写字母
现在默认的风格为path_pattern_parser风格(性能更好),but不能在路径的中间使用** ,即/abc/**/hh.html(不兼容),其他的ant语法都兼容
yml
spring:
  mvc:
    pathmatch:
    # 切换路径匹配策略
matching-strategy: ant_path_matcher # path_pattern_parser内容协商
内容协商,可以根据前端的accept请求头的参数或者queryString的format参数来返回不同类型的数据,例如json,xml
基于请求头的内容协商(默认开启)
- 根据Accept请求头的参数来返回不同的数据类型:application/json,application/xml,text/yaml
基于请求参数的内容协商(默认没有开启)
默认的参数名为format ,例如/hello?format=xml ,/hello?format=json
开启请求参数的内容协商
yml
spring:
  mvc:
    contentnegotiation:
    #开启基于请求参数的内容协商功能
      favor-parameter: true
      # 指定内容协商时使用的参数名,默认format
parameter-name: type # 修改参数的名称,默认为format; /hello?type=xml返回xml的数据需要导入的依赖
xml<dependency> <groupId>com.fasterxml.jackson.dataformat</groupId> <artifactId>jackson-dataformat-xml</artifactId> </dependency>
使用自定义消息转换器返回yaml的数据
java
public class YamlMessageConverter implements HttpMessageConverter<Object> {

    @Override
    public boolean canRead(Class<?> clazz, MediaType mediaType) {
        return getSupportedMediaTypes().contains(mediaType);
    }
    @Override
    public boolean canWrite(Class<?> clazz, MediaType mediaType) {

        return getSupportedMediaTypes().contains(mediaType);
    }

    @Override
    public List<MediaType> getSupportedMediaTypes() {
         List<MediaType> list = new ArrayList<>();
        list.add(new MediaType("application", "yaml", StandardCharsets.UTF_8));
        list.add(new MediaType("application", "yaml"));
        list.add(new MediaType("application", "yml", StandardCharsets.UTF_8));
        list.add(new MediaType("application", "yml"));
        return list;
    }

    @Override
    public Object read(Class<?> clazz, HttpInputMessage inputMessage) throws IOException, HttpMessageNotReadableException {
        return null;
    }

    @Override
    public void write(Object o, MediaType contentType, HttpOutputMessage outputMessage) throws IOException, HttpMessageNotWritableException {
        if (!getSupportedMediaTypes().contains(contentType)) {
            throw new RuntimeException("不支持该格式,请使用yml,或者yaml格式");
        }

        YAMLFactory yamlFactory = new YAMLFactory().disable(YAMLGenerator.Feature.WRITE_DOC_START_MARKER);
        ObjectMapper objectMapper = new ObjectMapper(yamlFactory);

        objectMapper.writeValue(outputMessage.getBody(), o);
    }
}java
@Configuration
public class MyWebMvcConfigurer  implements WebMvcConfigurer {
    @Override
    public void configureMessageConverters(List<HttpMessageConverter<?>> converters) {
      //将消息转换器添加进来
        WebMvcConfigurer.super.configureMessageConverters(converters);
        converters.add(new YamlMessageConverter());
    }
}yml
spring:
  mvc:
    contentnegotiation:
      favor-parameter: true
      parameter-name: type
        # 自定义媒体类型,使用请求参数进行内容协商的时候会生效
      media-types:
        yaml: application/yaml
yml: application/ymljava
@RestController
public class HelloController {
    @GetMapping("/hello")
    public ResponseEntity<User> hello() {
      /*
          @Override
    public List<MediaType> getSupportedMediaTypes() {
        return  MediaType.parseMediaTypes(List.of("application/yaml", "application/yml"));
    }
			这里有个坑,如果前面消息转换器设置媒支持的体类型时没有设置字符编码,这里contentType也不能设置,否则equals方法会返回false
			这里contentType中的类型会传入canWrite方法的mediaType参数中
      */
        return ResponseEntity.ok().contentType(new MediaType("application","yaml")).body(new User(1, "zwc", "admin", 1));
    }
}国际化
Springboot默认在类的根路径下查找messages资源绑定文件,文件名为messages.properties
例如messages.properties,messages_en.properties,messages_zh.properties
java
@RestController
public class MessageController {
  //通过messageSource获取国际化配置项的值
    @Autowired
    private MessageSource messageSource;

    @GetMapping("/show")
    public String show(HttpServletRequest httpServletRequest) {
        Locale locale = httpServletRequest.getLocale();
        System.out.println(locale);
      // 获取对应语言的内容
        String login = messageSource.getMessage("login", null, locale);
        System.out.println(login);
        return login;
    }
}properties
# messages_zh.properties
login = 登录
sigUp= 注册properties
# messages_en.properties
login = login
sigUp= signUp错误处理
查找页面的顺序:
静态资源的路径: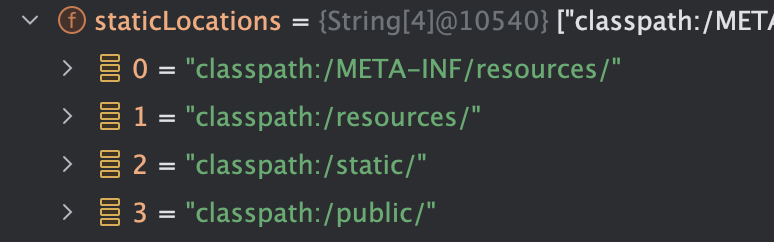
templates/error/404
静态资源路径/404.html
templates/error/4xx
静态资源路径/4xx.html
templates/error
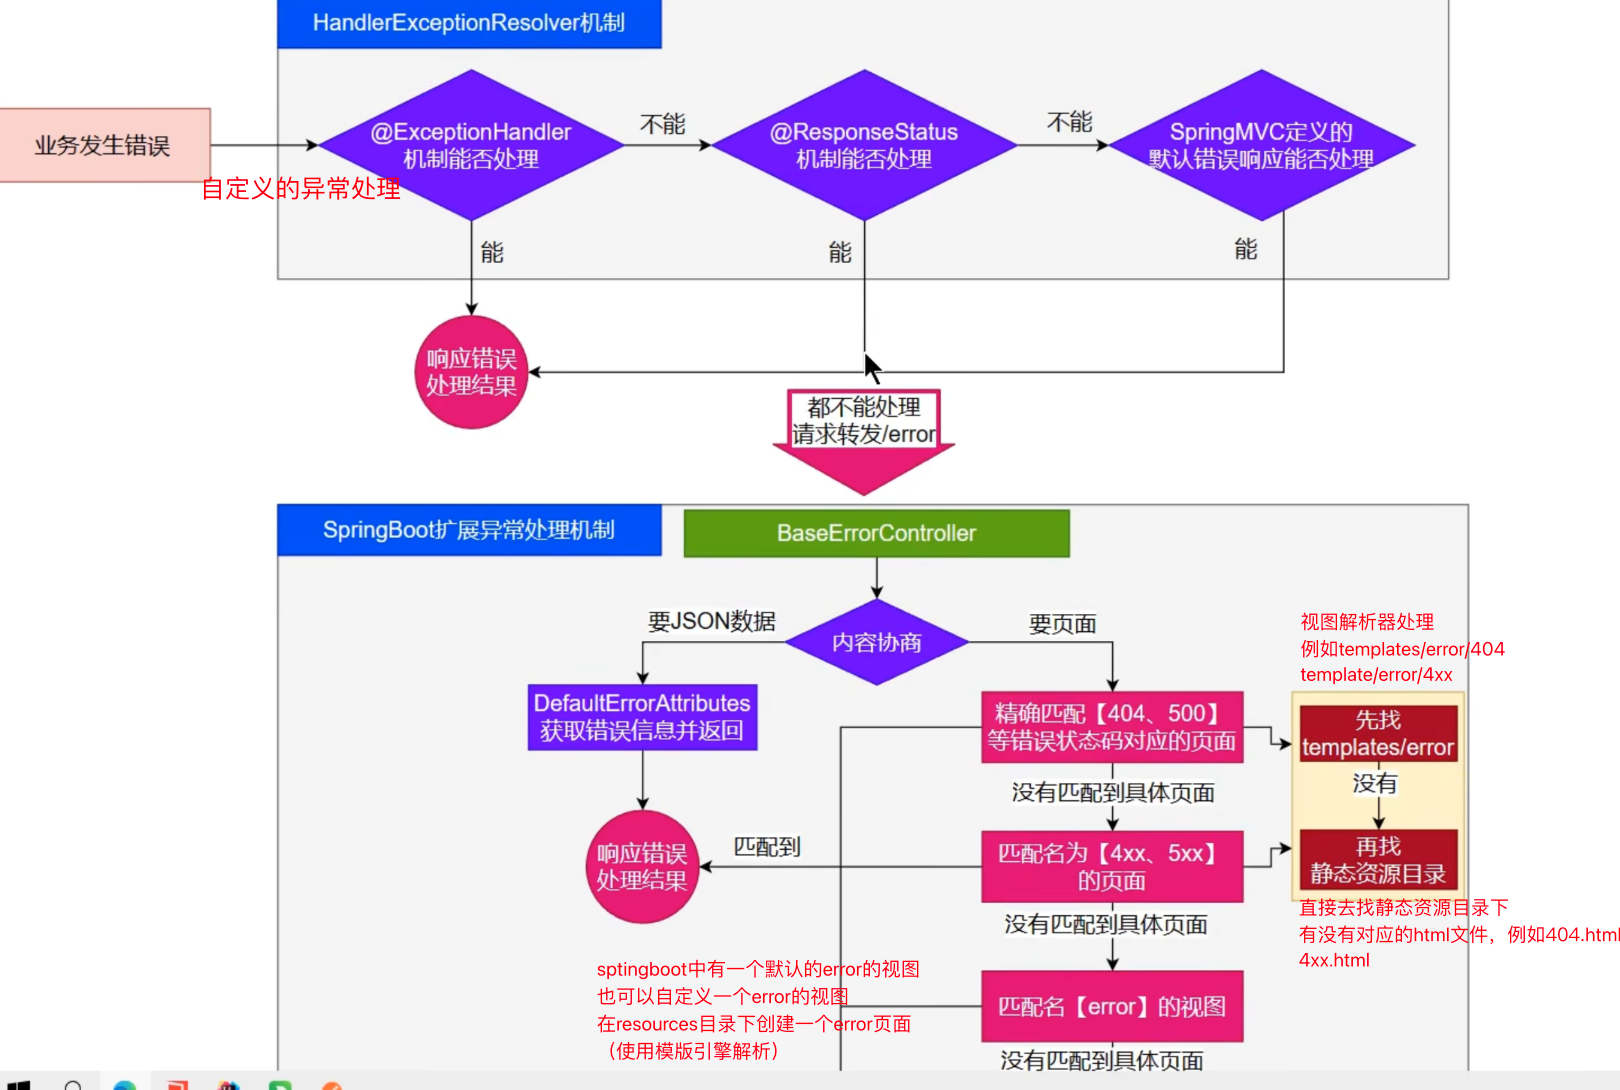
错误处理的最佳实践
前后端分离
- 后台发送的所有错误,由
@ControllerAdvice+@ExceptionHandler进行统一异常处理
服务端页面渲染
不可预知的一些错误,HTTP码表示的服务器或者客户端错误:
- 给classpath:/templates/error/放常用精确的错误码页面.404,403,401
- 给classpath:/templates/error/放模糊匹配的错误码页面。5xx,4xx
发生业务错误:
- 核心业务:每一种错误,都应该代码控制,跳转到自己定制的错误页
- 通用业务:classpath:templates/error 页面,显示错误信息
函数式web
这种方式可以将路由信息与业务逻辑处理分离开来
定义路由的信息
java
@Configuration
public class RouterConfig {
    @Bean
    public RouterFunction<ServerResponse> userRouter(UserController userController) {
        return RouterFunctions.route()
                .GET("/user1/{id}", RequestPredicates.all(), userController::getUser)
                .build();
    }
}对应的业务逻辑处理
java
@Slf4j
@Controller
public class UserController {

    public ServerResponse getUser(ServerRequest serverRequest) {
        log.info("路径参数为{}", serverRequest.pathVariable("id"));
        User user = new User("zwc", 19);
        return ServerResponse.ok().body(user);
    }
}@Configuration(proxyBeanMethods = false)的作用
@Configuration(proxyBeanMethods = false)的含义是告诉Spring容器在处理该配置类时,不需要为其方法生成CGLIB代理。这意味着在配置类中定义的@Bean方法不会被代理。
- proxyBeanMethods = true(默认值):Spring会为配置类生成CGLIB代理,以确保每个@Bean方法返回的都是单例Bean。这可以确保在配置类的方法调用时,Spring会拦截这些调用并返回已经创建的单例Bean。
- proxyBeanMethods = false:Spring不会为配置类生成CGLIB代理。每次调用@Bean方法时,Spring不会进行拦截,这可以提高启动性能,但需要确保配置类中的@Bean方法之间没有依赖关系。
使用场景:
- proxyBeanMethods = true:适用于配置类中方法之间有相互依赖的场景。例如,一个@Bean方法需要调用另一个@Bean方法时,确保返回的是同一个实例(单例Bean)。
- proxyBeanMethods = false:适用于配置类中方法之间没有相互依赖的场景。这种配置可以减少启动时间和内存消耗,适用于启动性能要求较高的场景。
配置文件使用Profile功能
application.yml主配置文件在任何情况下都生效 ,其他Profile环境下的命名规范:application-{profile标识}.yml,例如:application-dev.yml激活指定环境的效果:
生效的配置项=主配置文件的配置项+激活的环境的配置项,
若主配置文件中的配置项与激活环境的配置项冲突,以激活环境的配置项为准
各个配置文件的优先级
- 命令行 >
config/子目录的直接子目录 > config/子目录 > 当前目录下 > 项目内 classpath 下的/config包 > classpath 根路径 - Profile的 > application的
- properties 的文件 > yaml的文件
注入环境变量的限制
例如我们想要通过注入环境变量来改变端口号,我们需要注入这样一个环境变量,springboot会自动将其转化为配置属性server.port=9090,
java
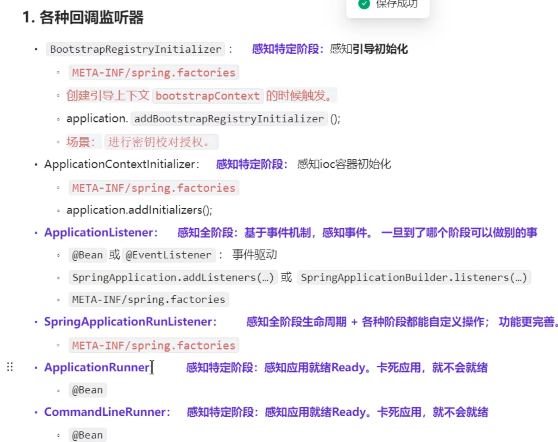
SERVER_PORT=9090启动阶段生命周期监听器
需要实现
SpringApplicationRunListener接口,并在META-INF/spring.factories文件下将自己的监听器注册进去yaml# 实现的接口的全类名 = 自己的监听器类的全类名 org.springframework.boot.SpringApplicationRunListener=\ leftover.first_learn_springboot.listeners.MyListener
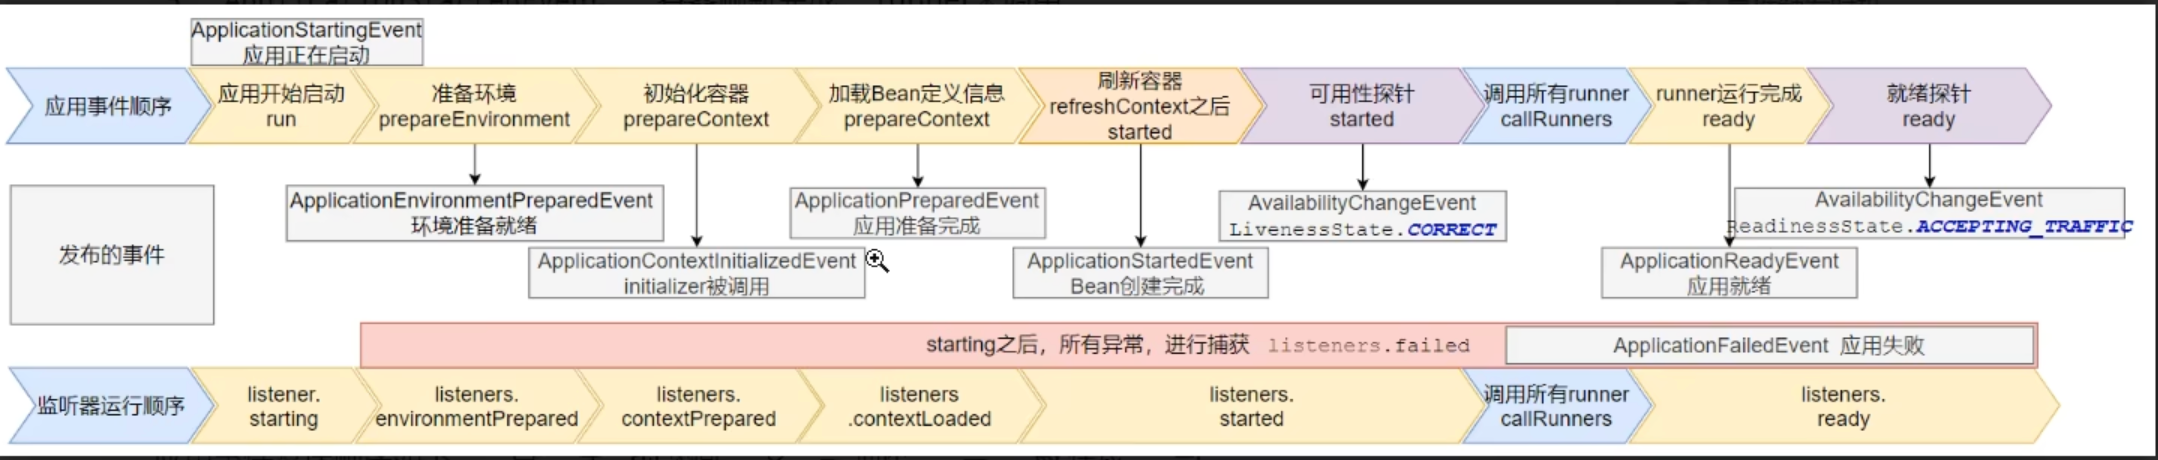
Springboot启动的生命周期流程
引导:利用BootStrapContext引导整个项目启动
- starting: 应用开始,SpringApplication的run方法一调用,就会被调用
- environmentPrepared: 环境准备好了(把启动参数等绑定到环境变量中了),但是ioc还没有创建
启动:
- contextprepared:ioc容器创建并准备好,但是source(主配置类)没有被加载,
- contextLoaded:ioc容器加载,source(主配置类)加载进去了,但是ioc容器还没刷新(bean还没创建)
运行:
- started: ioc容器刷新了(所有的bean创建好了),但是runner没调用
- ready:ioc容器刷新了(所有的bean创建好了),runner调用完了
异常
- failed:可以感知上述的6个过程,只要出现了异常就会执行failed方法
启动阶段的事件(9种)
ApplicationStartingEvent: 应用启动但未做任何事情就触发ApplicationEnvironmentPreparedEvent:Environment准备好,但是context未创建(IOC容器未创建)ApplicationContextInitializedEvent:ApplicationContext准备好(IOC容器创建完成),bean未加载ApplicationPreparedEvent:容器刷新之前,bean加载完成ApplicationStartedEvent: 容器刷新完成,runner未调用AvailabilityChangeEvent:LivenessState.CORRECT应用存活;存活探针ApplicationReadyEvent: 任何runner被调用AvailabilityChangeEvent:ReadinessState.ACCEPTING_TRAFFIC就绪探针ApplicationFailedEvent: 启动出错
事件驱动开发
在登录之后发送一个登录事件,可以做一些事情
事件发布:实现
ApplicationEventPublisherAware接口或者注入ApplicationEventMulticaster事件监听:组件+
@EventListener
java
// 发送事件者,需要实现ApplicationEventPublisherAware方法
// 这里有2种方法,第一种实现ApplicationEventPublisherAware接口,调用setApplicationEventPublisher方法设置ApplicationEventPublisher
//第二种:自动注入ApplicationEventMulticaster ,使用 ApplicationEventMulticaster来发送事件
//第一种可读性会更高一点,第二种会更简洁一点
@Component
public class EventPublisher implements ApplicationEventPublisherAware {
    private ApplicationEventPublisher applicationEventPublisher;
    @Autowired
    private ApplicationEventMulticaster applicationEventMulticaster;

    public void sendEvent(ApplicationEvent event) {
//        this.applicationEventPublisher.publishEvent(event);
        this.applicationEventMulticaster.multicastEvent(event);
    }

    @Override
    public void setApplicationEventPublisher(ApplicationEventPublisher applicationEventPublisher) {
        this.applicationEventPublisher = applicationEventPublisher;
    }
}java
//登录事件,需要继承ApplicationEvent类
public class LoginEvent<T> extends ApplicationEvent {
    public LoginEvent(T t) {
        super(t);
    }

    //    重写getSource方法,支持泛型
    @Override
    public T getSource() {
        return (T) source;
    }
}java
//controller
@RestController
public class LoginController {
    @Autowired
    private EventPublisher publisher;

    @GetMapping("/login")
    public void login(User user) {
        System.out.println(user);

        LoginEvent loginEvent = new LoginEvent(user);
      //发送loginEvent
        publisher.sendEvent(loginEvent);
    }
}java
@Service
public class SysService {

    @Order(1)
  //使用 @EventListener注解标注该方法监听哪些事件
    @EventListener(LoginEvent.class)
    public void loginNum(LoginEvent<User> event) {
        User user = event.getSource();
        System.out.println(String.format("%s已登陆", user.getUsername()));
    }
}java
@Service
public class CouponService {

  //使用 @EventListener注解标注该方法监听哪些事件
    @EventListener(LoginEvent.class)
    @Order(2)
    public void giveCoupon(LoginEvent <User> event) {
        User user = event.getSource();
        System.out.println(user.getUsername() + "获得一张优惠券");
    }
}java
//pojo 类
@Data
@AllArgsConstructor
@NoArgsConstructor
public class User {
    private String username;
    private String password;
}自动配置starter
study_springboot项目中的robot-springboot-starter中编写了一个starter
AOT 和 JIT
- AOT: Ahead-of-Time(提前编译):程序执行前,全部编译成机器码
- JIT: Just in Time(即时编译):程序边编译,边运行
Runner
CommandLineRunner 和 ApplicationRunner 是 Spring Boot 提供的两个方便的接口,用于在应用程序启动后立即执行一些代码。它们主要应用于初始化任务、一次性任务、调试和测试等场景。通过实现这些接口,可以轻松地在 Spring Boot 应用启动后执行特定逻辑,满足各种初始化需求。
Formatter
Formatter与MessageConverter的区别:
MessageConverter: HTTP消息转换,将HTTP请求体转换为Java对象,或将Java对象转换为HTTP响应体。
Formatter:将请求体中的某个字段转化成某个Java类型,或者将某个Java类型转化为字符串
java
@Getter
public enum Status {
    ACTIVE, INACTIVE, DELETED;
}java
//formatter
public class StatusFormatter implements Formatter<Status> {
    @Override
    public Status parse(String text, Locale locale) throws ParseException {
        Status status = Status.valueOf(text.toUpperCase());
        return status;
    }

    @Override
    public String print(Status object, Locale locale) {
        return object.name();
    }
}java
//注册formatter
@Configuration
public class MyWebMvcConfigurer implements WebMvcConfigurer {
    @Override
    public void addFormatters(FormatterRegistry registry) {
        registry.addFormatterForFieldType(Status.class, new StatusFormatter());
    }
}ProblemDetail
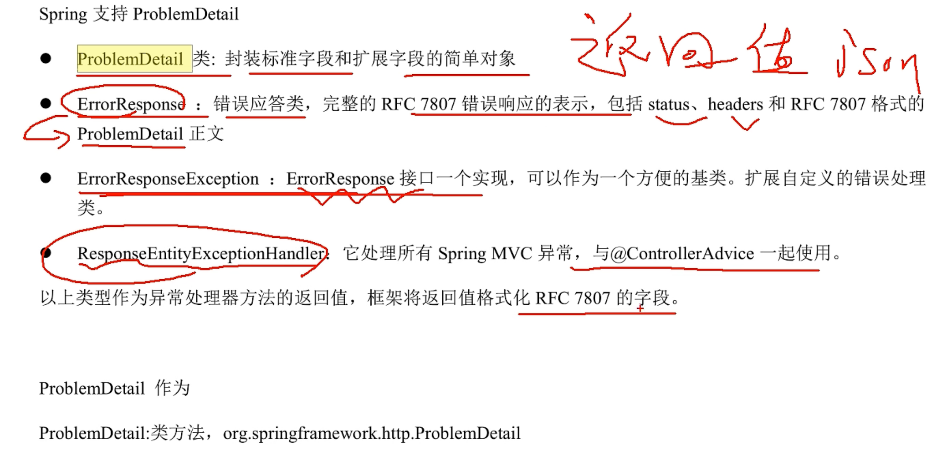
使用ErrorResponseException: 可以作为一个基类,我们可以用其他类继承它,扩展自己的自定义错误处理类
javapublic class BookNotFoundException extends ErrorResponseException { public BookNotFoundException(HttpStatus status, Throwable ex) { super(status, createProblemDetail(status, ex.getMessage()), ex); } public BookNotFoundException(HttpStatus status, String details) { super(status, createProblemDetail(status, details), null); } public static ProblemDetail createProblemDetail(HttpStatus status, String details) { ProblemDetail problemDetail = ProblemDetail.forStatus(status); problemDetail.setTitle("图书异常"); problemDetail.setDetail(details); problemDetail.setProperty("客户邮箱:", "172@qq.com"); return problemDetail; } }ResponseEntityExceptionHandler(抽象类)(重要)
通过继承
ResponseEntityExceptionHandler类并覆盖其预定义的方法吗(可以用来处理springmvc中的通用异常),可以集中处理Spring Boot应用程序中的各种异常。这样做不仅提高了代码的可读性和可维护性,还可以为用户提供一致且详细的错误信息。使用@ControllerAdvice注解将异常处理器应用于全局,使得异常处理变得更加简洁和高效。
java
//全局处理异常类
@ControllerAdvice
public class MyCustomExceptionHandle extends ResponseEntityExceptionHandler {

    @Override
    protected ResponseEntity<Object> handleNoResourceFoundException(NoResourceFoundException ex, HttpHeaders headers, HttpStatusCode status, WebRequest request) {
        ProblemDetail problemDetail = ProblemDetail.forStatus(status);
        problemDetail.setDetail(ex.getMessage());
        problemDetail.setProperty("客户邮箱:", "1323@qq.com");

        return ResponseEntity.of(problemDetail).build();
    }
}java
   @GetMapping("/hello")
    public ResponseEntity<User> hello(HttpServletRequest httpServletRequest) throws NoResourceFoundException {
        throw new NoResourceFoundException(HttpMethod.GET, "/resource");
}HttpExchange 和 WebClient
java
//声明请求的接口
public interface WebInterface {
    @GetExchange(url = "https://jsonplaceholder.typicode.com/todos/{id}", accept = "application/json")
    Todo getTodoById(@PathVariable("id") Integer id);
}java
@Configuration(proxyBeanMethods = false)
public class HttpConfiguration {
    @Bean
    public WebInterface createWebInterface() {
        WebClient webClient = WebClient.builder().build();
        HttpServiceProxyFactory factory = HttpServiceProxyFactory.builderFor(WebClientAdapter.create(webClient)).build();
        return factory.createClient(WebInterface.class);
    }
}java
  	// 具体的使用
		@Autowired
    WebInterface webInterface;
    @Test
    public void testWebInterface() {
        Todo todo = webInterface.getTodoById(2);
        System.out.println(todo);
}文章作者:leftover
版权声明: 所有文章除特别声明外,均采用 CC BY-NC-SA 4.0 许可协议。转载请注明来自 leftover!